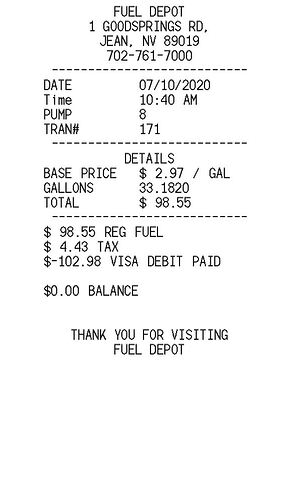
Below how I add my fuel receipts with the help of a Account Move Template.
Introduction
When you have several recurring account moves you can create a template so it would be very easy to create them. An account move template is basically a ‘normal’ account move. But instead of adding values you are adding ‘keywords’. When you are creating an account move from the template, you will be asked to give values for the ‘keywords’. Tryton will then create the ‘real’ account move and replace the ‘keywords’ with the actual values you provided.
In this howto we are using a fuel receipt as base.
Note: We only give you some guidance. This is because we are using the demo server of Tryton which don’t have taxes and the accounts are very general. With this hopefully you will get an idea how it should work and you have to adapt it to your own needs.
Creating the Account Move Template
To create a template you have to have Account Administration rights which give you access to the Configuration menu
under Financial. Go to Financial -> Configuration -> Templates -> Moves and create a new template.
There are several fields to be filled in. Important one is the Name which of the template. This will be shown when you are going to use the template from Financial -> Entries -> Create Move from Template.
When entering the Description you can use keywords as well. For example you can use Gas receipt for {car} on {date} as the description which have car and date as
keywords. We have to add these keywords on the keywords tab. Create the two keywords with:
-
car:
- Name: car
- String: Car driven
- Type: Char
-
date:
- Name: date
- String: Date filled
- Type: Date
When you want to have a keyword required, check the checkbox Required. Save the template and test it by adding a new account move from template. Start at Financial -> Entries -> Create Move from Template and select the newly created template and click Next. You will see now two fields which are basically the keywords you just created. Fill them with some text and a date respectively and click create. A new account move is created and take special attention to the description where the keyword tags are now replaced with the data you entered.
When everything is working correctly, we can move on and add Lines to the template. Nice thing about the template is that is also allows to do calculations so we can reduce the amount of data to be entered by the user. When we are looking at our receipt we see 3 interesting details:
- total costs
- total without tax → filled in by the user
- amount of tax → filled in by the user
First we are adding two new keywords and save the template.
-
extax:
- Name: extax
- String: Total amount without TAX
- Type: Numeric
- Digits: 2
- Required: checked
-
tax:
- Name: tax
- String: Amount of TAX
- Type: Numeric
- Digits: 2
- Required: checked
With the keywords in place, we can now add the different Lines. In our case you have to create 3 lines:
-
Account for the amount without tax:
- Account: enter the account based on your needs
- Operation: Debit
- Amount: extax
- Description: Amount without TAX
-
Account for the TAX:
- Account: enter the account based on your needs
- Operation: Debit
- Amount: tax
- Description: TAX amount
-
Account for the total amount:
- Account: enter the account based on your needs
- Operation: Credit
- Amount: extax + tax
- Description: Total amount receipt
Because the Lines field is an editable list, it’s a bit harder to enter the TAX properties because you have to open the line (red boxed icon).

Select the “Account for the amount without tax” and open the line and select the Taxes tab. Create a new TAX line:
- Tax: enter the TAX account based on your needs
- Amount: extax
- Type: Base
Close the dialog by applying the changes and select the line “Account for the TAX” and do the same:
- Tax: enter the TAX account based on your needs
- Amount: tax
- Type: Tax
Note: Be careful with spaces and captions in the name of a keyword and be consistent throughout the template.
Save the template and test the template and see if everything is added correctly. Make adjustments when needed.
