Move template basics

Move templates (to be found at Menu > financial > config > templates > moves) IMHO are one of the very strongpoints if Tryton. With only typing in some numbers, you can create quite complex split accounting entries, which can save a lot of work for (monthly) repeating incidents.

Setup of a basic move template is doable even for me, but correct handling of VAT seems to be tricky. I’d like to collect the basics and sum them up. Maybe end of the day we’ll come to the conclusion that we should have a “create move template” wizard to make the setup achievable for the rest of us.

Thanks a lot in advance, Wolf

PS: I’m adding some screenshots of my templates - for inspiration and review. AKAIK, at the moment they do accounting correctly, but not VAT reporting.

A simple one: postal fee to be refunded by the company
(without VAT, thus should be fine):

keywords:
Porto-Barauslage-SchlW

A more complex one: business guest invoice, with 2 VAT rates and a 20% rate not covered by the company

keywords:

Bewirtungen-Bewirtungen-Bruttobetr-SchlW

@acaubet , take over… (;

Sorry, I can not in an example which I can not translate and with a Chart of Accounts and a tax law I don’t know anything about it. That’s why I think it’s difficult to provide a generic guidance as it depends on the purpose of the account move example, the chart and the tax low.

I can show you like I tried to do where you can fill the taxes. But I can not be specific about amounts or taxes.

An account move template is basically a ‘normal’ account move. But instead of adding values you are adding ‘keywords’. When you are creating an account move from the template, you will be asked to give values for the ‘keywords’. Tryton will then create the ‘real’ account move and replace the ‘keywords’ with the actual values you provided.

To make the post more general can you provide the images in the English language with English text? It makes it more readable for the general public.

If you want, I can also create a small guide to create a account move template to create gas receipts very quickly.

Thank you @edbo. I think, I got the basics - but I’m hanging with VAT. Would be great if you could focus on these.

Thanks as well @acaubet , your examples do suffer from the same problem as mine - they are not in English, thus of limited use.

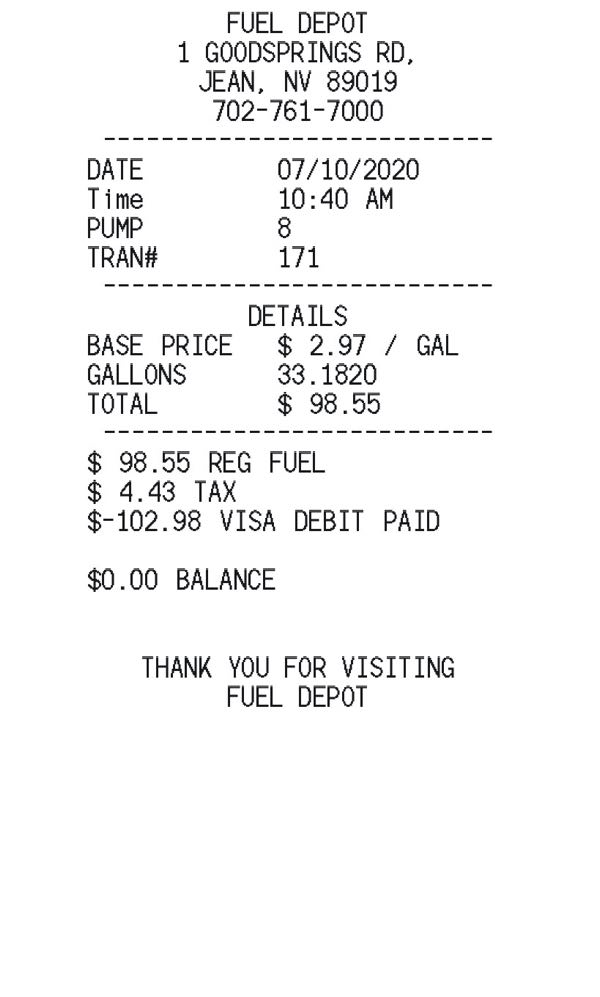
Below how I add my fuel receipts with the help of a Account Move Template.

Introduction

When you have several recurring account moves you can create a template so it would be very easy to create them. An account move template is basically a ‘normal’ account move. But instead of adding values you are adding ‘keywords’. When you are creating an account move from the template, you will be asked to give values for the ‘keywords’. Tryton will then create the ‘real’ account move and replace the ‘keywords’ with the actual values you provided.

In this howto we are using a fuel receipt as base.

Note: We only give you some guidance. This is because we are using the demo server of Tryton which don’t have taxes and the accounts are very general. With this hopefully you will get an idea how it should work and you have to adapt it to your own needs.

Creating the Account Move Template

To create a template you have to have Account Administration rights which give you access to the Configuration menu
under Financial. Go to Financial -> Configuration -> Templates -> Moves and create a new template.

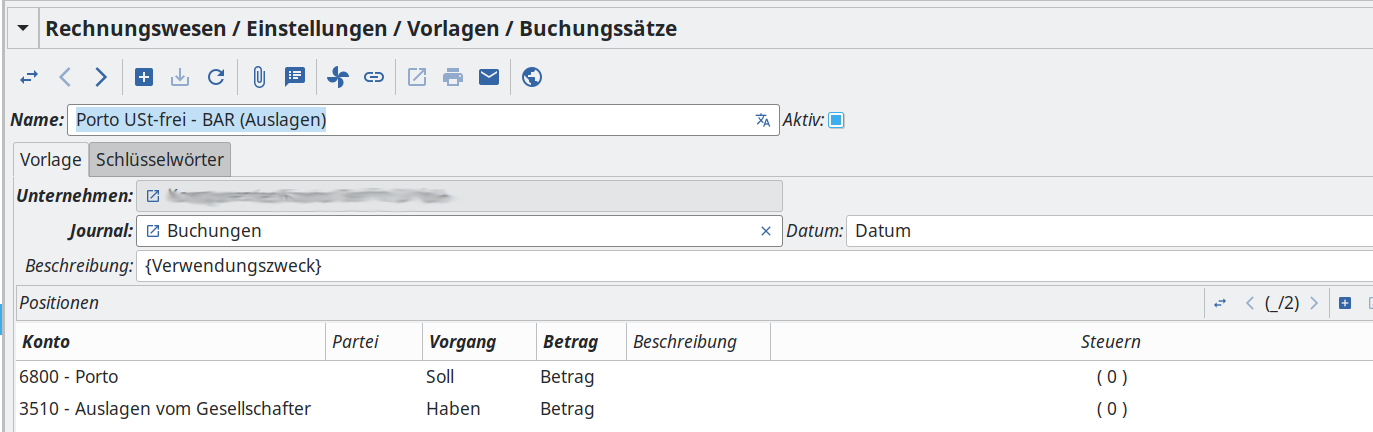
There are several fields to be filled in. Important one is the Name which of the template. This will be shown when you are going to use the template from Financial -> Entries -> Create Move from Template.
When entering the Description you can use keywords as well. For example you can use Gas receipt for {car} on {date} as the description which have car and date as
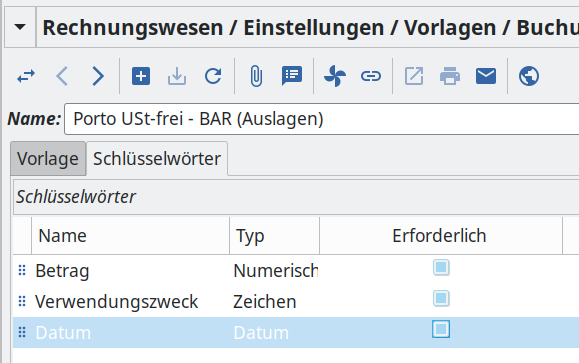
keywords. We have to add these keywords on the keywords tab. Create the two keywords with:

  • car:

    • Name: car
    • String: Car driven
    • Type: Char
  • date:

    • Name: date
    • String: Date filled
    • Type: Date

When you want to have a keyword required, check the checkbox Required. Save the template and test it by adding a new account move from template. Start at Financial -> Entries -> Create Move from Template and select the newly created template and click Next. You will see now two fields which are basically the keywords you just created. Fill them with some text and a date respectively and click create. A new account move is created and take special attention to the description where the keyword tags are now replaced with the data you entered.

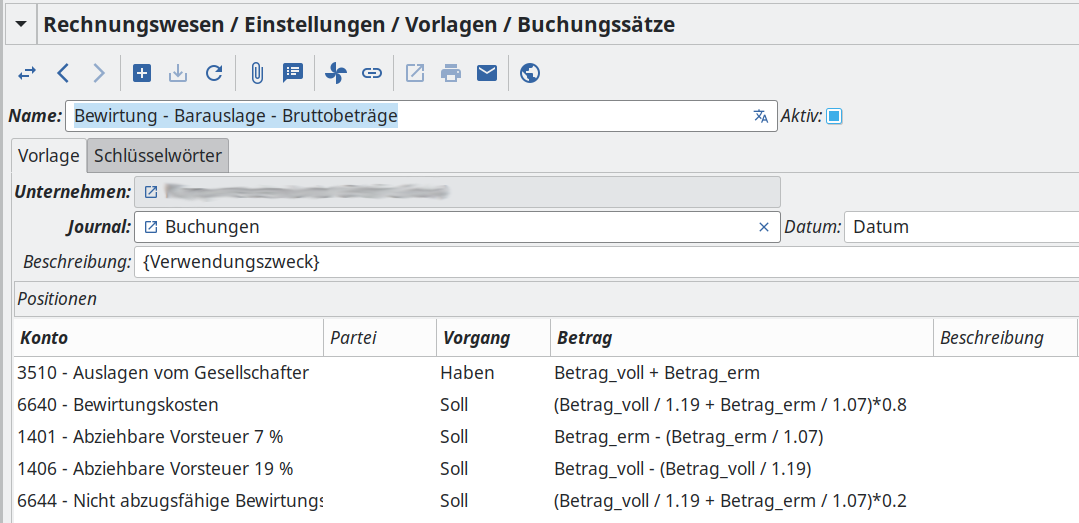
When everything is working correctly, we can move on and add Lines to the template. Nice thing about the template is that is also allows to do calculations so we can reduce the amount of data to be entered by the user. When we are looking at our receipt we see 3 interesting details:

  • total costs
  • total without tax → filled in by the user
  • amount of tax → filled in by the user

First we are adding two new keywords and save the template.

  • extax:

    • Name: extax
    • String: Total amount without TAX
    • Type: Numeric
    • Digits: 2
    • Required: checked
  • tax:

    • Name: tax
    • String: Amount of TAX
    • Type: Numeric
    • Digits: 2
    • Required: checked

With the keywords in place, we can now add the different Lines. In our case you have to create 3 lines:

  • Account for the amount without tax:

    • Account: enter the account based on your needs
    • Operation: Debit
    • Amount: extax
    • Description: Amount without TAX
  • Account for the TAX:

    • Account: enter the account based on your needs
    • Operation: Debit
    • Amount: tax
    • Description: TAX amount
  • Account for the total amount:

    • Account: enter the account based on your needs
    • Operation: Credit
    • Amount: extax + tax
    • Description: Total amount receipt

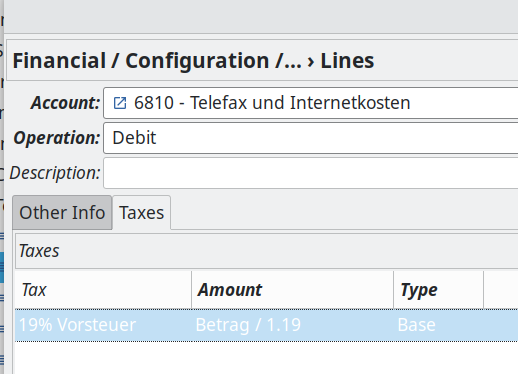
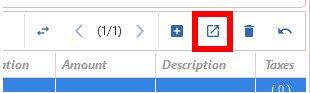
Because the Lines field is an editable list, it’s a bit harder to enter the TAX properties because you have to open the line (red boxed icon).

open_editable_record

Select the “Account for the amount without tax” and open the line and select the Taxes tab. Create a new TAX line:

  • Tax: enter the TAX account based on your needs
  • Amount: extax
  • Type: Base

Close the dialog by applying the changes and select the line “Account for the TAX” and do the same:

  • Tax: enter the TAX account based on your needs
  • Amount: tax
  • Type: Tax

Note: Be careful with spaces and captions in the name of a keyword and be consistent throughout the template.

Save the template and test the template and see if everything is added correctly. Make adjustments when needed.

2 Likes

Sorry for late reply. Dreamteam herrdeh & @efe are exploring your advice, we’ll report back soon.

Cheers,
Wolf

hi there, thanks a lot for that clear and precise description.

On question though: why don’t you enter those as invoices in tryton ?

I know that technically they are not invoices, but the invoice workflow is perfect for these, and you can even store the scanned document with the invoice record.

You’re welcome. I hope you now can use this powerful feature even more.

Then I have to create a party, mark the account where I book the invoice as reconcilable, create the invoice, add invoice lines and taxes, click on buttons to go through the workflow etc. which in all takes a lot more time then just entering the date, amount without tax and the tax amount. Also you can scan the receipt and add it to the account move record as well (what I do by the way). When I import my bank statements everything gets booked correctly against each other.

And last but not least, it prevents me from making mistakes. I don’t drive that much so I’m not going very often to the fuel station. And to think and rethink which accounts to use on the invoice lines is something I don’t want to do as I always take the wrong account which has then be corrected again by account moves.

Companies with a fleet of cars / trucks have most of the time a contract with a fuel supplier. They will indeed get an invoice and go that way.

Ok I see. Most of the times for these I just duplicate an existing invoice and change the date and amount, so accounts and taxes are already right. But I get your point.

Sorry for my late reply - this one was a big challenge to me… ): - Had a talk on this with my friend @rmartin yesterday, and he added this hint:

With instructions as given, you will be able to do VAT reporting correctly. But at least in Germany, we need to report base values as well. To achieve this, we need to do as follows:

Bildschirmfoto vom 2024-02-11 07-51-39

So the extax line needs to be worked on in the same way as the tax line, except the amount is different and the type is set to “base” instead of “tax”.

Did we get this right - and does it apply in other countries as well?

And yet another hint @edbo himself gave me:
You can use formulas in the “amount” fields, so you can start either from net or gros values and let Tryton do the maths.

Cheers,
Wolf